Friday, 5 July 2013

Make-Up Brushes

I'm not sure what brand the numbers correlate to, but this pic I found gives a good idea as to what all the different make-up brushes are used for.

xoxo B xoxo

Wednesday, 3 July 2013

The Professional Look

The common eyeshadow palette. Some of the colours may seem pointless if you don't know what they are used for. Medium shades can be fantastic blending tools. This is a wonderful illustration on how to use the various shades found in most pharmacy brand eyeshadows.

1. The Highlighter : lashes to lid
2. The Medium-Dark : blend over the outer half of lid, lashes to crease.
3. Dark : apply in a C/V-shape on outside of the eyelid, keeping to natural crease lines and blending harsh lines.
4. Light-Medium: blend into the entire crease.

Finish off with liner and mascara! Intensify by using a darker dark and a lighter highlighter.

xoxo B xoxo

Monday, 1 July 2013

Weddings - On the Job

I love these beautiful pics sent to me by one of my brides, Paula. I was glad to be around for touch-ups throughout the day. Having an experienced make-up artist around on your wedding day can really help to ease the stress. We are not only there to make sure you look amazing all day, but are so experienced in all sorts of wedding day prep and drama. We have seen an array of things go wrong with the dress, hair, schedules and bridal party, and are usually prepped with the skills or knowledge to help out. Invest in an experienced professional and you won't be disappointed on your most important day. 

www.bronwynkaye.wix.com/make-up

xoxo B xoxo

Wednesday, 26 June 2013

Which Red is Right for Me?

Good question. And you are right in being cautious with which shade of red you buy.
You need to work out what your skin undertone is. Either cool (pink to blueish-red), warm (yellow to olive) or neutral (not obviously cool or warm).

Um ...awesome.

Don't panic.
Look on the inside of your wrist. If your veins look more blue you are likely a cool undertone. If your veins look more green then you probably are a warm undertone.

Now match your shade's undertone to your own. Fair skin/cool undertones should stick with something that's not too orange or warm in its undertone. Neutral or warmer tones can go for a shade that has more blue in the colour mixture if they want lips to pop or orange undertones if they want a more harmonious look.

NB: not all light skin is blue undertoned and not all dark is warm. Very dark skin is usually a warm undertone, unless for example an Ethiopian or Nigerian skin is usually cool/blue.

Good Luck!

xoo B xoxo

Wednesday, 12 June 2013

Brush Basics


Make-up Brush Basics


Make-up Artists will always give you this advice : Invest in a set of quality brushes.

I agree, its great advice, and you agree, that all sounds very exciting. So you take a casual walk around the closest MAC store, see the prices, hear the jargon, freak out and leave the decisions for another day. The truth is before anyone gets caught up in the industry, there's hardly anyone that can give a clue as to what goes with which and how it should -or shouldn't- be used. It can be very overwhelming, and lets be honest, its not cheap. The good news is that if you know your basic application needs, and buy a really good quality set to meet them, you probably won't have to replace your set for a good few years.

Here are some basics I feel are worth investing in for the everyday woman.

Foundation 


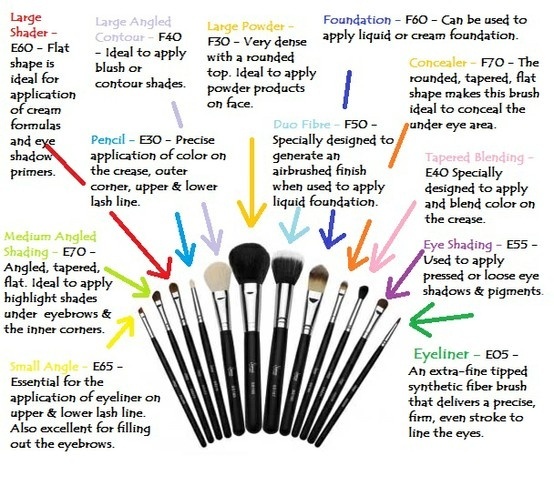
Stippling Brush / Duo Fibre
mac stippling duo-fibre brush large small
MAC Stippling / Duo-Fibre brushes

These brushes are fantastic for foundation application and give a flawless airbrushed look. Don't be fooled by brushes that simply have two different colour bristles. The duo fibre brush is made from two very different kinds of fibres- natural (dark colour bristles) and synthetic (white).
 I use them for mineral as well as liquid foundation. Use this brush with small quantities of product and apply in short stippling (dotting) and light circular motions.


The classic foundation brush


This can be used for liquid or cream foundation
 These come in various shapes and sizes, including a square tipped shape as well as miniature versions for small areas and concealer. Start in the middle of your face and work the foundation outwards. Short criss-cross motions will help prevent streaks
mac foundation brush
Mac Foundation Brush
mac concealer brush
Mac Concealer Brush

Powder


If you use a cream or liquid foundation that doesn't set (transfers) use some translucent powder and apply with a powder brush like this one, or a powder puff. 

Blusher

 Apply a small amount to the apples of your cheeks with the blusher brush. This part is easy to see when you smile.


Eyebrows/ Eyeliner

 Use the small angled brush for filling in eyebrows or for applying eyeliner. I personally always use powder instead of pencil as it gives a more natural finish, and find this brush indispensable.


 The Fluff Brush is wonderful applying shadow to the lid area.


\
I love the Blending Brush. This is my absolute favourite and its used for blending the eyeshadow and softening lines. Soft blended eyeshadow is the best way to make your makeup look professional.


Variations of all these brushes are made by most professional cosmetic houses in varying degrees of quality and cost. I would say these are the most important to a personal kit and definitely worth spending on. You can add other tools and brushes as you go along. 

Find more information on these Mac brushes http://www.maccosmetics.com 

Essence is a super brand and very affordable. You can get it at Clicks or Dischem here in South Africa. Perhaps try out some of their brushes for your starter kit?

xoxo B xoxo